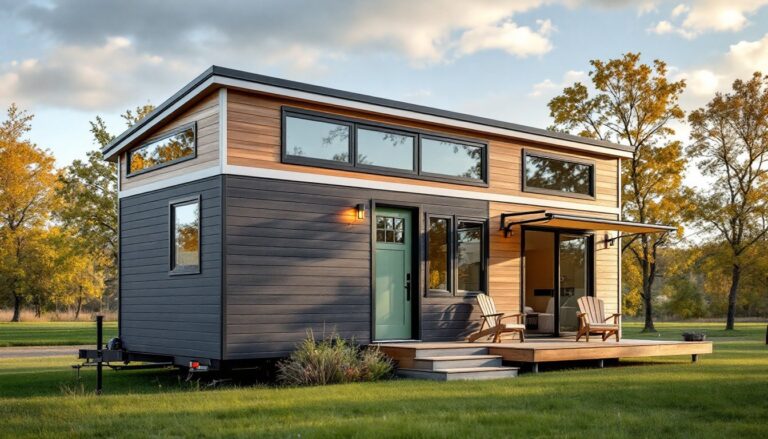
Tiny homes pack full living into tight square footage, and every vertical inch counts. The staircase to a sleeping loft or upper storage area is rarely just a means of getting up and down, it’s often the biggest opportunity for storage, visual impact, and spatial efficiency in the entire build. But cramming stairs into a home with less than 400 square feet means balancing code requirements, headroom, safety, and function. A poorly designed staircase wastes precious floor space, creates hazards, and limits how comfortably residents move through their home. This guide walks through the most practical stair designs for tiny homes, the safety and code considerations that matter, and construction tips for DIYers ready to build their own.
Table of Contents
ToggleKey Takeaways
- Tiny home stairs must balance code compliance, safety, and space efficiency since they can consume 10% or more of total floor area—making thoughtful design critical to livability.
- Storage-integrated staircase designs maximize functionality by converting each step into a drawer, cabinet, or cubby, eliminating the need for separate furniture while occupying the same footprint.
- Alternating tread and ship ladder stairs cut horizontal space requirements by up to 50%, making them ideal when floor space is extremely limited, though they require deliberate stepping and aren’t suitable for homes with children or elderly residents.
- Proper headroom (6 feet 8 inches minimum), consistent riser height (typically 7–7.75 inches), tread depth (10–12 inches), and handrails are non-negotiable safety elements that reduce fall risk and meet building code standards.
- DIY builders should use full-extension, 100-pound-rated drawer slides for storage stairs, secure the assembly to multiple wall studs and loft joists with structural screws, and account for total weight distribution—critical since storage stairs can exceed 150 pounds when fully assembled.
- Verify local building requirements early: homes permitted as ADUs must comply with IRC standards, while RV-titled tiny homes operate in a grey area where adopting IRC guidelines improves resale value and safety even when not legally required.
Why Stair Design Matters in Tiny Homes
In a conventional home, stairs occupy a dedicated hallway or corner, space that’s accepted as necessary but not particularly useful. In a tiny home, that same footprint could represent 10% or more of the total floor area. Choosing the wrong stair type can mean losing room for a kitchen counter, a closet, or comfortable seating.
Beyond space, stair design directly impacts livability. Steep or narrow stairs become difficult for anyone carrying laundry, groceries, or a sleeping child. Poor headroom at the top or bottom of the stairs leads to constant ducking and occasional head injuries. And because many tiny homes sit on trailers, structural considerations like weight distribution and fastening methods require more care than a traditional build.
The goal is a staircase that meets minimum safety standards, uses vertical and horizontal space efficiently, and supports daily routines without frustration. That means thinking through tread depth, riser height, handrail placement, and how the stairs integrate with adjacent furniture or storage. Most tiny home builders find that hybrid designs, stairs that double as storage, seating, or even kitchen cabinetry, deliver the best return on square footage.
Popular Tiny Home Stair Design Options
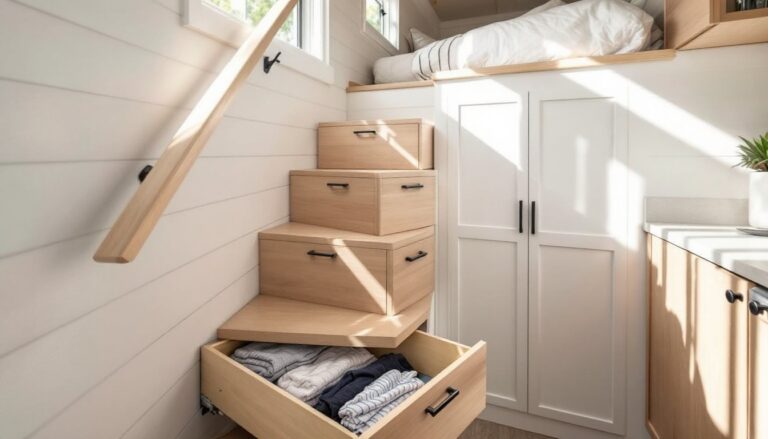
Storage-Integrated Staircase Designs
Storage stairs are the most common solution in tiny homes, and for good reason: each step can function as a drawer, cabinet, or open cubby. The stair structure itself becomes a piece of furniture, eliminating the need for separate dressers or pantry shelving.
Construction typically involves building a series of boxes with 3/4-inch plywood or hardwood, stacked and secured to form the stair profile. Each box gets a drawer face or hinged door. Tread depth usually runs 10 to 12 inches, and riser height stays around 7 to 8 inches to keep the climb comfortable. The entire assembly is screwed into wall studs on one side and often supported by a central stringer or side panels.
Drawer hardware should be full-extension, soft-close slides rated for at least 100 pounds per drawer, especially if storing tools, books, or canned goods. Many builders using small space storage solutions find that pull-out drawers work better than lift-up lids, which require clearance and can slam on fingers.
One challenge: storage stairs take up more horizontal run than steep alternatives. A typical layout for an 8-foot loft height needs about 10 to 12 feet of floor space, which isn’t always available. If floor space is tight, consider a hybrid approach with storage in the lower steps and a steeper ladder or alternating tread design for the upper portion.
Alternating Tread and Ship Ladder Stairs
Alternating tread stairs (also called paddle stairs or Jefferson stairs) cut the horizontal footprint nearly in half compared to standard stairs. Each step has a full-depth tread on one side and a cutout on the other, so left and right feet alternate. This design allows a steeper angle, typically 56° to 68°, while still offering reasonable foot purchase.
These stairs work well when floor space is extremely limited but full ladder access feels too precarious. The trade-off: they require a deliberate, one-foot-after-the-other descent, and carrying large items becomes awkward. They’re not ideal for homes with young children, elderly residents, or anyone with mobility limitations.
Construction uses a pair of 2×12 stringers with tread cutouts staggered left and right. Treads should be at least 8 inches deep and 6 to 8 inches wide per paddle. Use 1×10 or 2×10 hardwood for the treads themselves, pine or fir works, but oak or maple handles foot traffic better without splintering.
Ship ladders take the concept further: a near-vertical ladder (75° to 80°) with deep treads and a sturdy handrail. These occupy minimal floor space, sometimes just 2 feet of horizontal run, but require both hands free for safe descent. Ship ladders are best suited to lofts used only for sleeping, where trips up and down are infrequent.
Both designs must include a continuous handrail on at least one side, securely fastened to blocking within the wall. Many jurisdictions don’t have specific codes for tiny homes on wheels, but if the home is permitted as an ADU or permanent dwelling, expect the building inspector to require IRC-compliant handrails: 34 to 38 inches high, graspable profile, and capable of withstanding 200 pounds of lateral force.
Safety Considerations for Tiny Home Stairs
Tiny home stairs often push the boundaries of conventional building codes, and that’s where safety issues crop up. Even if a home on a trailer isn’t subject to local inspection, ignoring basic stair safety leads to falls, injuries, and insurance headaches.
Headroom is the most commonly overlooked dimension. IRC requires 6 feet 8 inches of clear headroom measured vertically from the nose of each tread. In a tiny home with 8-foot ceilings and a loft floor, this often means the top few treads encroach into the loft space or the staircase starts farther from the wall than expected. Measure carefully during the design phase, retro-fitting headroom is expensive.
Tread depth and riser height follow a formula: twice the riser height plus the tread depth should equal 24 to 25 inches. So a 7.5-inch riser pairs with a 10-inch tread (2 × 7.5 + 10 = 25). This ratio keeps the stride comfortable and reduces trip hazards. Inconsistent riser heights are a leading cause of stair falls, so cut and install with precision.
Handrails aren’t optional. Even a three-step staircase benefits from a grab rail. Mount rails 34 to 38 inches above the tread nosing, and ensure they return to the wall or terminate in a way that won’t snag clothing. For alternating tread stairs, a rail on both sides is strongly recommended.
Lighting matters more in a tiny home, where spaces are compact and transitions happen quickly. Install LED step lights or a motion-activated overhead fixture so the stairs are visible at night. Battery-powered puck lights work if running electrical is challenging.
Finally, finish treads with a non-slip surface. Sanded and sealed wood is fine, but add adhesive tread strips or a textured paint additive if the stairs see wet feet from a nearby shower or exterior entry.
Building Codes and Requirements
Most tiny homes on wheels fall into a grey area: they’re titled as RVs, so traditional residential building codes don’t apply. But if the home is financed, insured, or certified under the NOAH (National Organization of Alternative Housing) standard, stairs must meet certain minimums.
RV Industry Association (RVIA) standards allow ladders and alternating tread stairs without the same restrictions as the IRC. But, many builders find that home maintenance guides recommend erring toward IRC standards for resale value and safety, even when not required.
If the tiny home is permitted as an Accessory Dwelling Unit (ADU) or permanent structure, it must comply with local amendments to the IRC. That typically means:
- Minimum 36-inch stair width (measured between handrails)
- Maximum riser height of 7.75 inches
- Minimum tread depth of 10 inches
- Continuous handrail on at least one side
- Guardrails at any open side with a drop of more than 30 inches
Some jurisdictions have adopted appendices specifically for tiny homes (like IRC Appendix Q), which relax certain stair requirements for homes under 400 square feet. Check with the local building department early, retrofitting stairs to code after a failed inspection is a major setback.
Materials and Construction Tips for DIY Builders
Building stairs from scratch is within reach for intermediate DIYers, but it requires accurate layout, solid joinery, and attention to load paths. Here’s what to gather and how to approach the build.
Materials list (for a typical 8-foot storage stair):
- Four to six sheets of 3/4-inch plywood (cabinet-grade maple or birch if drawers will be visible)
- Two 2×6 or 2×8 boards for mounting cleats
- Wood glue, 2-inch trim screws, and 3-inch structural screws
- Drawer slides: full-extension, 100-lb rated, one pair per drawer
- Drawer pulls or handles
- Sandpaper (80, 120, 180 grit)
- Primer and paint or stain
- Polyurethane or hard wax oil for tread surfaces
Tool list:
- Circular saw or track saw (a miter saw helps for crosscuts, but isn’t required)
- Drill and impact driver
- Tape measure, framing square, and level
- Clamps (at least four 24-inch bar clamps)
- Jigsaw for any curved or notched cuts
- Random orbital sander
Construction steps (overview):
-
Lay out the stair profile on a piece of plywood or directly on the subfloor. Calculate total rise (floor to loft surface) and divide by target riser height to determine number of steps. Adjust riser and tread dimensions to fit.
-
Cut side panels (stringers) from 3/4-inch plywood. These form the outer profile. For storage stairs, you’ll build individual boxes rather than traditional notched stringers.
-
Assemble each step as a box: bottom, back, two sides, and tread. Use wood glue and 2-inch screws at every joint. Pre-drill to avoid splitting near edges.
-
Stack and secure boxes starting from the bottom. Screw through the back panel into wall studs, and fasten adjacent boxes to each other. Use 3-inch screws into blocking or directly into the loft frame at the top.
-
Install drawer slides according to manufacturer specs. Most require a 1/2-inch gap on each side. Test fit before final assembly.
-
Add treads last. If using hardwood, overhang the front edge by 1 inch to create a nosing. Sand all surfaces to 180 grit, especially edges that hands will touch.
-
Finish with primer and two coats of paint, or stain and polyurethane. For treads, consider a satin or matte poly, gloss shows wear and can be slippery.
Pro tips:
- Dry-fit everything before gluing. Mistakes are easier to fix before fasteners go in.
- If building on-site in the tiny home, work in sub-assemblies that fit through the door.
- Use a pocket-hole jig (like a Kreg) for hidden fasteners on visible drawer faces. It’s faster and cleaner than face-screwing and filling.
- Acclimate plywood in the space for 48 hours before cutting. Moisture changes can cause panels to warp after assembly.
- Wear safety glasses, hearing protection, and a dust mask, cutting sheet goods creates a lot of fine dust.
For those less confident with a saw, many DIY project tutorials offer cut-list generators and step-by-step plans tailored to specific loft heights and widths. Pre-cut kits are also available from tiny home suppliers, though they’re pricier than buying raw materials.
Weigh the stair assembly before installation. A storage staircase with hardwood treads and full-extension slides can exceed 150 pounds, and that load should spread across multiple wall studs and loft joists. Use construction adhesive and structural screws, not just trim screws, for critical connections.